 |
| Those nails are so gneiss |
Recently Meaghan showed Amy some very cool "burned book" fingernail art and pointed out how much better it would be with scientific figures. Amy took on the challenge the next rainy day. The result? Geology-themed fingernails!!! Now we are bringing the nail magic to you, faithful readers, so follow the tutorial below to be the most stylish geologist* of the century!!!
*Admittedly not too hard to be when most of us wear sales-rack REI quick-dry shirts and paint-stained mom jeans, completing our outfit with a sweat-stained fishermans hat. Still, we bet that look (Field Gear Chic) would go great with strat column fingernails!
STEP ONE: GATHER YOUR SUPPLIES
Here's what you'll need:

- You will need a source material for your nail art, such as a magazine, newspaper, or whatever. I personally found the magazine to work the best, but you might want to experiment.
- You also need a light-colored nail polish (tan, white, light pink, etc.) and a top coat polish.
- The last necessity is the alcohol, I did some research and learned that rubbing alcohol is most commonly used, but straight up vodka will do the trick, too. The thing to look for is % alcohol: you want yours to be somewhere between 40-50% alcohol. The rubbing alcohol I had is 70%, which apparently is too much and it did not work nearly as well as the vodka (which is 40%).
STEP TWO: COVER YOUR BASES


- First, paint your light-colored base coat
- While waiting to dry, cut out your printed material: think small! Though not in the photo above my favorite print to use was a simple geologic map from the GSA magazine because of the fun and recognizable patterns.
STEP THREE: THE HARD PART

- Pour a little vodka in a cup, drink it. Pour a little more in the cup
- Take your desired printed material and soak it in alcohol for 15-20 seconds
- Remove from the cup, set the paper on your nail, and HOLD IT DOWN for 10-20 seconds (or however long it takes the alcohol to evaporate) so that the total surface area of your nail is completely in contact with the paper
- Peel off paper

- I noticed that the ink transferred the best when my nails were still slightly tacky
- Keep in mind that the image you choose will be reversed on your nail... slightly difficult to read but still looks awesome. Y'all can tell who I'm reppin' on my finger, right??
STEP FOUR: TOP IT OFF

- After you peel off the printed material your nail may look a little dull and/or chalky but have no fear, that's why you have a top coat.
- Apply a healthy amount of clear top coat to your newly geologically-enhanced fingernail
- Allow nails to dry
STEP FIVE: SHOW IT OFF
You now have the fiercest, geologically-accurate nails of all time. Be proud. Text pictures to your friends to make them jealous. This will probably only work if your friends are also giant nerds.
 |
| Luckily the Vengeance Team has no shortage of nerds |

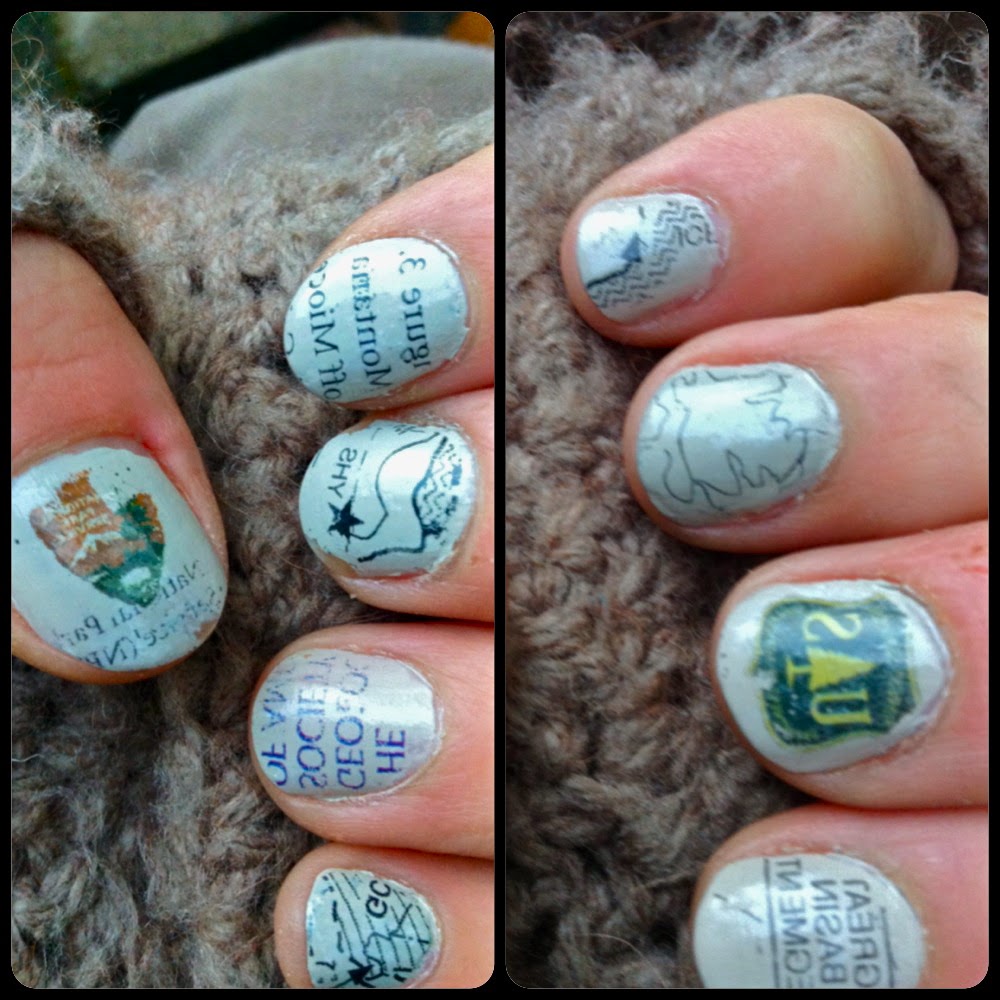
This was my first attempt so y'know they're not perfect but I still can't stop looking at them! This is a creative project for any rainy day, made even better with vodka. Frankly, it opens up tons of opportunities, too: can't fit those references on your poster for a conference? Put 'em on your nails! Need a quick and easy teaching tool for mineral structure as a TA? Talking points for a speech?
No wait, don't do that last one. You'll just look like Sarah Palin, but way worse.
No comments:
Post a Comment